A great custom design starts with accurate measurements, and we’ve created three educational tools to assist you in getting a jump-start on your project.
All you will need to measure your closet is:
- Simple, sturdy tape measure
- A pen and paper
- Valet Custom Cabinets & Closets How to Measure Your Closet Guides
Our simple, one-page guide will walk you through each step of measuring your closet so that you can start the process of designing your custom closet solution.
In our video guide, talented Valet Custom Cabinets & Closets designer Catrina Palmer walks you through, step-by-step, of taking accurate measurements for your closet. She also shares some helpful tips and tricks she uses while in the field to make sure your measurements are as true-to-life as possible.
In addition, we have created a printable How to Measure Your Closet Guidebook, which will help you measure your San Francisco Bay Area closet like a pro. You can download the guide here or read the text below.
HOW TO MEASURE YOUR SAN FRANCISCO BAY AREA CLOSET
How to Accurately Measure Your Closet and Other Spaces
Providing accurate measurements is an important first step in our virtual design consultation process. With this guide you will be able to provide us with the measurements we need to start working on designs for any space in your home. Prior to production, we will then arrange for a site visit to confirm measurements and assure your project goes in smoothly.
Spaces in your current residence
You will need a tape measure (1” wide, 12” length minimum) and a pen or pencil.
Spaces that are still under construction due to remodel/new construction
Our designers can work with your architectural drawings to design a space in your home.
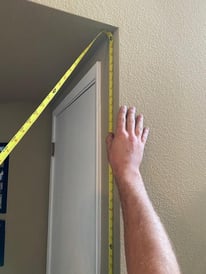
Ceiling Height
- Pull out the measuring tape and create a fold so that the numbered side is inside the fold.
- Start from the floor and work your way up with the 1” mark secured beneath your foot. If your tape has a locking mechanism you can use that as well.
- Use one hand to raise the tape to the ceiling, while keeping it taut with your other hand.
- Then, use the corner between the ceiling and nearest wall to fold the tape where the two meet.
- Lower it back down to eye level to see the number.
- Record this number on the measurement worksheet
Header/Soffit Height
The header/soffit is the wall space above your doors in a reach-in closet
- Repeat the steps for measuring the ceiling, but stop when you get to the base of the header/soffit
- Do not include the door track hardware in your measurement
- Record this number on the measurement worksheet
Width
The width is the side-to-side measurement of the closet wall
- Follow the vertical approach for height and adjust to horizontal to measure width
- Secure the 1” mark against the left wall of the closet then pull the tape until you reach the right wall.
- Ensure the tape is taut against the wall
- Measure at 3 heights on the wall (low, middle, high)
- Record the smallest measurement on the worksheet
Depth
The depth of the closet is the measurement of the side walls of the closet The typical depth of a reach-in closet is 24”. The depth of a walk-in closet can be any measurement and It can be larger than the width
- Place the 1” mark on the tape against the back/side wall and extend the tape to the front/next wall.
- Follow the above step for each wall
- Measure each side and record the numbers on the worksheet
Return/Wing Walls
The return/wing walls are the walls at the front of the closet on either side of the door
- Step inside the closet and measure each return/wing wall individually
- Each one may be a different size
- Measure these walls from the side of the closet to the door frame
- Measure the width of your door(s) including the casing/trim molding
- Record the measurements on the worksheet
Doors
Most closets have either hinged, sliding bi-pass, pocket or bi-fold doors
- Record the type of door on the worksheet
- For hinged doors, notate the swing direction.
Obstructions
Common obstructions include windows, outlets, switches, alarm boxes, safes, plumbing access, wires, fire sprinklers, light fixtures and vents.
- Look at the walls, ceiling and floor of your closet and notate any obstructions
- List dimensions of each obstruction on the worksheet
Other Spaces
- Use the same steps listed above for any other space in your home
- Common products we offer are:
- Home Offices
- Wall Beds (Murphy Beds)
- Guest Rooms
- Media Centers
- Family Room Solutions
- Alcove Spaces
- Niche Spaces
- Mud Rooms
- Laundry Rooms
- Pantries
- Garages
- Home Office with Wall Beds
General Information
- Flooring – Carpet, hardwood, tile, laminate, cement
- Baseboards – indicate yes or no as well as the height
- Walls – sheetrock, plaster, concrete, cinder block, studs
Photographing Your Space
- In addition to obstacles, it is also quite helpful if you provide pictures of your entire closet or room prior to your virtual design consultation
- Take these images while standing in the doorway.
- In a clockwise fashion, take a picture of every surrounding wall.
- If something is difficult to portray in a picture, please mention it to your designer during your virtual design consultation.
Other Helpful Information
- Closets
- Will it be a shared closet or just for one person?
- If for one, a male or female?
- Will it be a shared closet or just for one person?
- Drawers
- If yes, approximately how many?
- Other Features
- Laundry hampers
- Belt and tie racks
- Pull out Valet Rods
- Jewelry trays and safes
- Mirror
- Ironing Board
- Island, vanity or bench seat
- Lighting (includes names of lighting)
- Decorative Hardware
- Home Offices
- One workstation, two or more?
- Computer equipment – laptop, CPU, monitor size
- Printers, paper shredder, routers
- Filing storage
- Task lighting
- Display Space
- Guest Rooms with Wall Beds (Murphy Beds)
- Queen, full or single
- Reading Lights
- Side Cabinets
- Nightstand
- Wardrobe Storage
- Display Shelving
- Integrated Cabinetry to make the space multi-use
- Media Centers
- TV Size
- Speaker Size
- Other Electronic Components
- Special Storage Requirements (CDs, DVDs)
- Display Space
- Garages
- Primary storage requirements
- Number of bins being stored
- Work or hobby bench?
- Hanging storage
- Specialty storage (files, golf clubs, skis, etc)
- Epoxy Flooring

Valet Custom Cabinets & Closets designs, manufactures and installs custom organizational solutions that enhance the functionality of your living space while complementing the décor of your home.
Our talented design team creates unique solutions tailored to your specific needs, style, and budget. We are independently owned and a direct manufacturer.
Our areas of specialty include Home Offices, Wall Beds, Media Centers, Closets, Pantries, Garage Cabinetry, and much more.
Exceptional Design * 5-Star Execution and Service *
Expert Craftsmanship
 Catrina Palmer
Catrina joined the Valet team in March 2019. She comes with an extensive background in interior design, home staging and hospitality. Catrina’s passion is to enrichen her customers’ lives through beautiful and functional designs. Through her superior listening skills and attention to detail, she determines her customer’s needs and creates an exceptional design that works with their unique space. She holds an Interior Design Certificate from West Valley College. In Catrina’s free time she enjoys hiking, yoga, going to the beach and spending time with her daughter.